Jenkins持续集成
持续集成 / Jenkins简介
开源持续集成(Continuous Integration)工具,具有自动化构建、测试、部署等功能。
Jenkins的特征
- 开源的 Java 语言开发持续集成工具,支持持续集成、持续部署。
易于安装部署配置:
- 可通过 yum (apt) 安装,或下载 war包 、通过 docker容器 等方式实现快速安装部署
- 可方便 web界面 配置管理
消息通知及测试报告:
- 集成 RSS/E-mail 通过RSS发布构建结果或当构建完成时通过e-mail通知
- 生成 JUnit/TestNG 测试报告
- 分布式构建: 支持Jenkins能够让多台计算机一起构建/测试
- 文件识别:Jenkins能够 跟踪 哪次构建生成哪些jar,哪次构建使用哪个版本的jar等。
丰富的插件支持:支持扩展插件,如:
- git
- svn
- maven
- docker
- 等等
Jenkins 安装和持续集成环境配置
持续集成流程说明
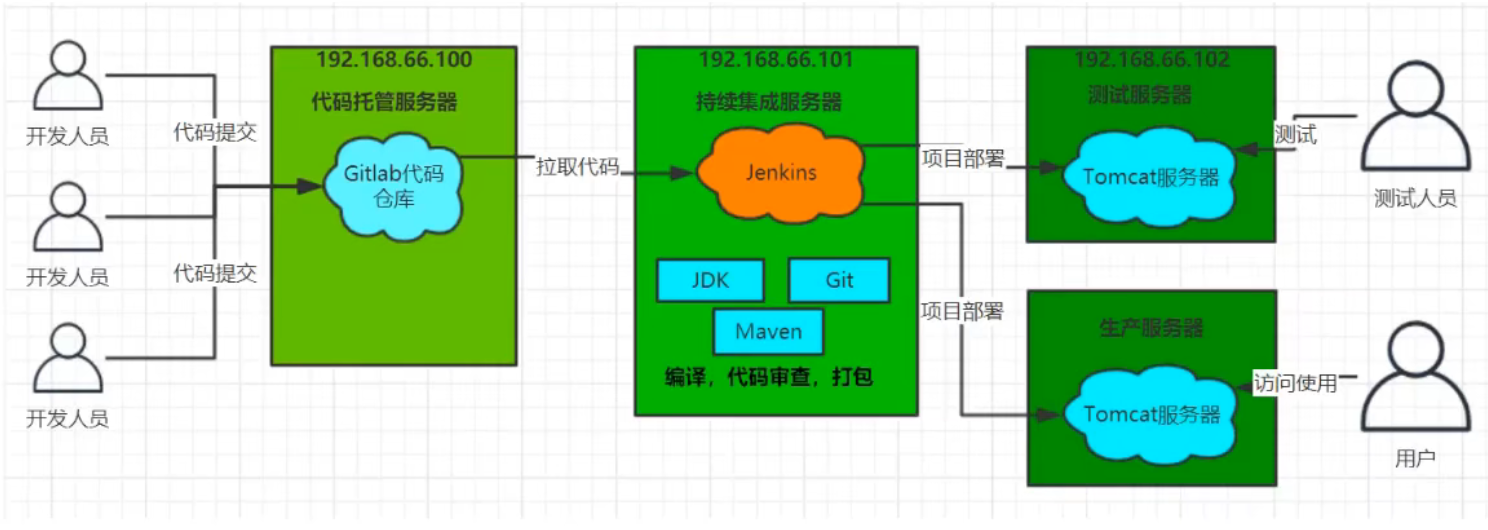
1) 开发人员进行代码提交,将代码上传到Git仓库
2) Jenkins作为持续集成工具,使用Git工具到Git仓库拉取代码到集成服务器,配合JDK、Maven等软件完成代码编译
进行代码测试与审查、测试、打包等工作
过程中的任一流程出错,都将重新执行一次整个流程
3) Jenkins将生成的jar包或war包分发到测试服务器或者生产服务器
测试人员或用户此时可以访问应用
服务器列表
| 名称 | IP地址 | 安装的软件 |
|---|---|---|
| 代码托管服务器 | 192.168.88.131 | GitLab |
| 持续集成服务器 | 192.168.88.132 | Jenkins , JDK 1.8, Maven , Git , SonarQube |
| 应用测试服务器 | JDK 1.8, Tomcat |
环境一:代码托管服务器
192.168.88.131
GitLab代码托管服务器安装
GitLab简介
官网 https://about.gitlab.com
GitLab是一个用于仓库管理系统的开源项目(基于 MIT 协议),使用Git作为代码管理工具,并在此基础上搭建起来的web服务。
GitLab安装 (CentOS)
安装相关依赖
yum install policycoreutils openssh-server openssh-clients postfix
yum install policycoreutils-python启动ssh服务 & 设置为开机启动
systemctl enable sshd && systemctl start sshd
设置postfix开机自启并启动(postfix支持gitlab发信功能)
systemctl enable postfix && systemctl start postfix
开放ssh以及http服务,然后重新加载防火墙列表
firewall-cmd --add-service=ssh --permanent
firewall-cmd --add-service=http --permanent
firewall-cmd --reload
下载gitlab包并安装
在线下载安装包:
wget https://mirrors.tuna.tsinghua.edu.cn/gitlab-ce/yum/el7/gitlab-ce-15.4.6-ce.0.el7.x86_64.rpm
安装:
rpm -i gitlab-ce-15.4.6-ce.0.el7.x86_64.rpm
rpm -i gitlab-ce-15.4.6-ce.0.el7.x86_64.rpm --nodeps --force[root@localhost ~]# rpm -i gitlab-ce-15.4.6-ce.0.el7.x86_64.rpm --nodeps --force 警告:gitlab-ce-15.4.6-ce.0.el7.x86_64.rpm: 头V4 RSA/SHA1 Signature, 密钥 ID f27eab47: NOKEY JSON file with existing configuration not found inside /opt/gitlab/embedded/nodes. Skipping config check. gitlab preinstall: gitlab preinstall: This node does not appear to be running a database gitlab preinstall: Skipping version check, if you think this is an error exit now gitlab preinstall: gitlab preinstall: gitlab preinstall: This node does not appear to be running puma and/or sidekiq services gitlab preinstall: Skipping unmigrated data check, if you think this is an error exit now gitlab preinstall: It looks like GitLab has not been configured yet; skipping the upgrade script. *. *. *** *** ***** ***** .****** ******* ******** ******** ,,,,,,,,,***********,,,,,,,,, ,,,,,,,,,,,*********,,,,,,,,,,, .,,,,,,,,,,,*******,,,,,,,,,,,, ,,,,,,,,,*****,,,,,,,,,. ,,,,,,,****,,,,,, .,,,***,,,, ,*,. _______ __ __ __ / ____(_) /_/ / ____ _/ /_ / / __/ / __/ / / __ `/ __ \ / /_/ / / /_/ /___/ /_/ / /_/ / \____/_/\__/_____/\__,_/_.___/ Thank you for installing GitLab! GitLab was unable to detect a valid hostname for your instance. Please configure a URL for your GitLab instance by setting `external_url` configuration in /etc/gitlab/gitlab.rb file. Then, you can start your GitLab instance by running the following command: sudo gitlab-ctl reconfigure For a comprehensive list of configuration options please see the Omnibus GitLab readme https://gitlab.com/gitlab-org/omnibus-gitlab/blob/master/README.md Help us improve the installation experience, let us know how we did with a 1 minute survey: https://gitlab.fra1.qualtrics.com/jfe/form/SV_6kVqZANThUQ1bZb?installation=omnibus&release=15-4修改gitlab配置
vim /etc/gitlab/gitlab.rb
修改gitlab访问地址和端口,默认为80,在此修改为82
external_url 'http://192.168.88.131:82'
nginx['listen_port'] = 82
vim 搜索
/nginx['listen_port'
重载配置及启动gitlab
gitlab-ctl reconfigure
gitlab-ctl restart
将端口添加到防火墙
firewall-cmd --zone=public --add-port=82/tcp --permanent
firewall-cmd --reload
首次登陆并修改密码
首次登录时,使用root用户
初始密码存放在
/etc/gitlab/initial_root_password中
GitLab添加组、创建用户、创建项目
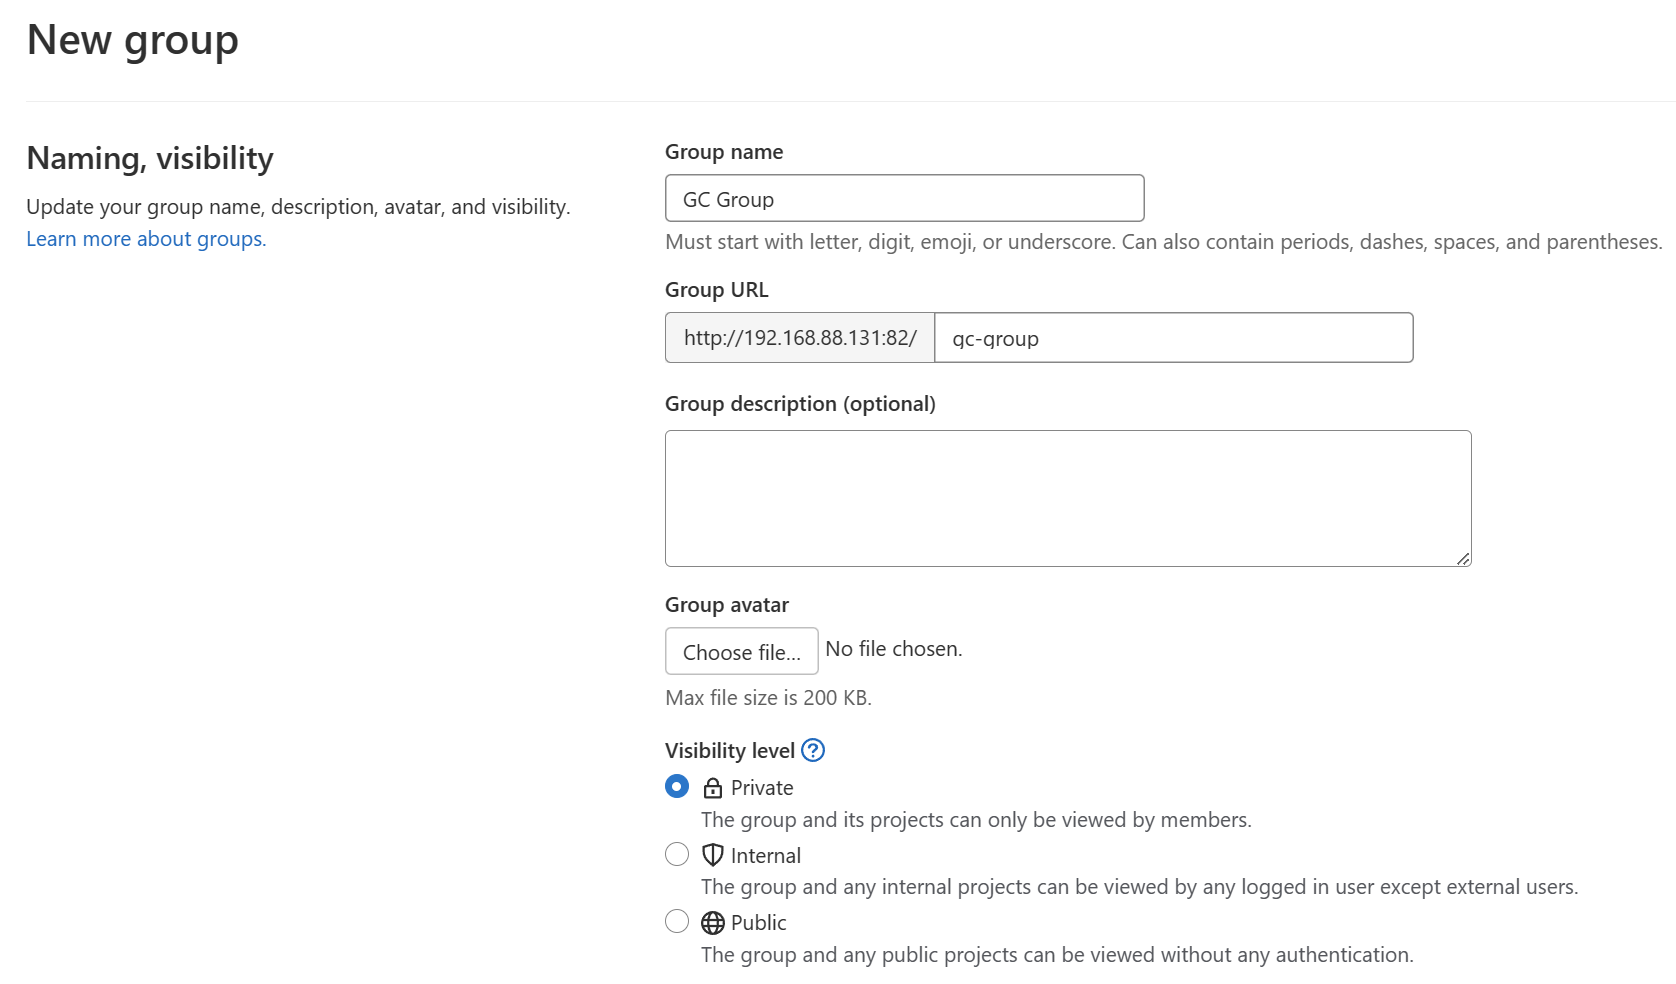
创建组
使用管理员root创建组
一个组里面可以有多个项目分支,可以将开发添加进组进行权限配置
不同的组就是团队不同的开发项目或者
不同的组添加不同的开发即可实现对开发设置的管理
- Visibility level

创建项目
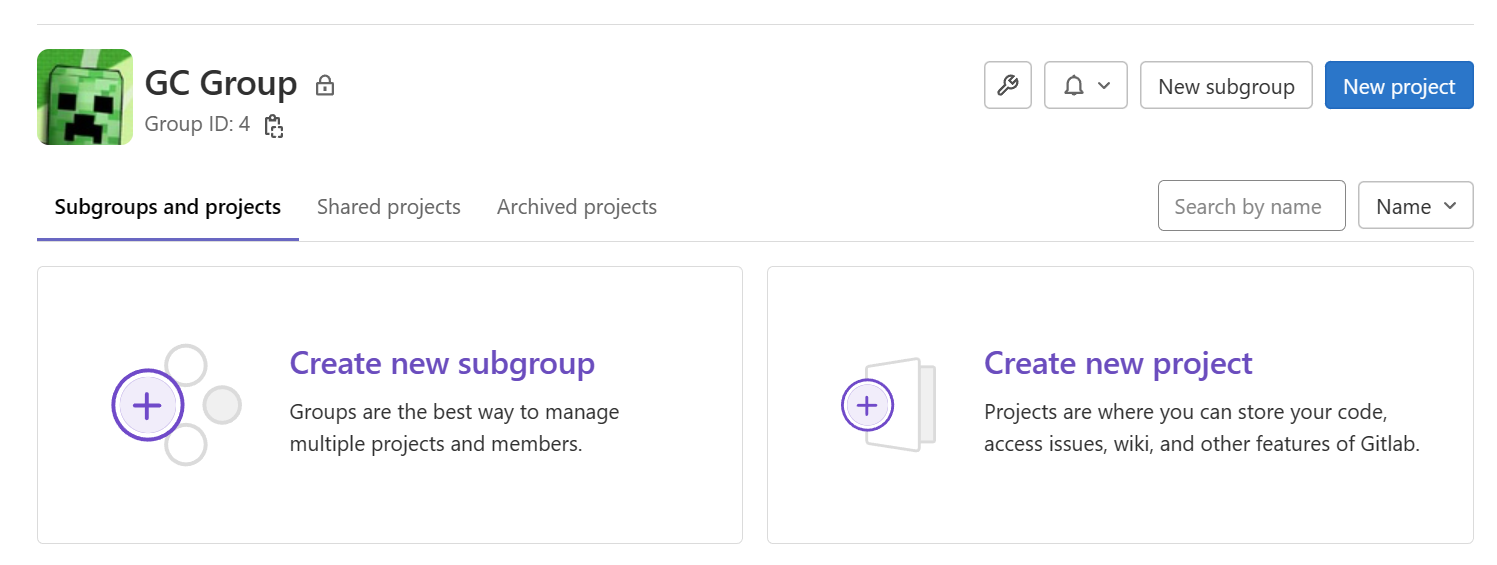
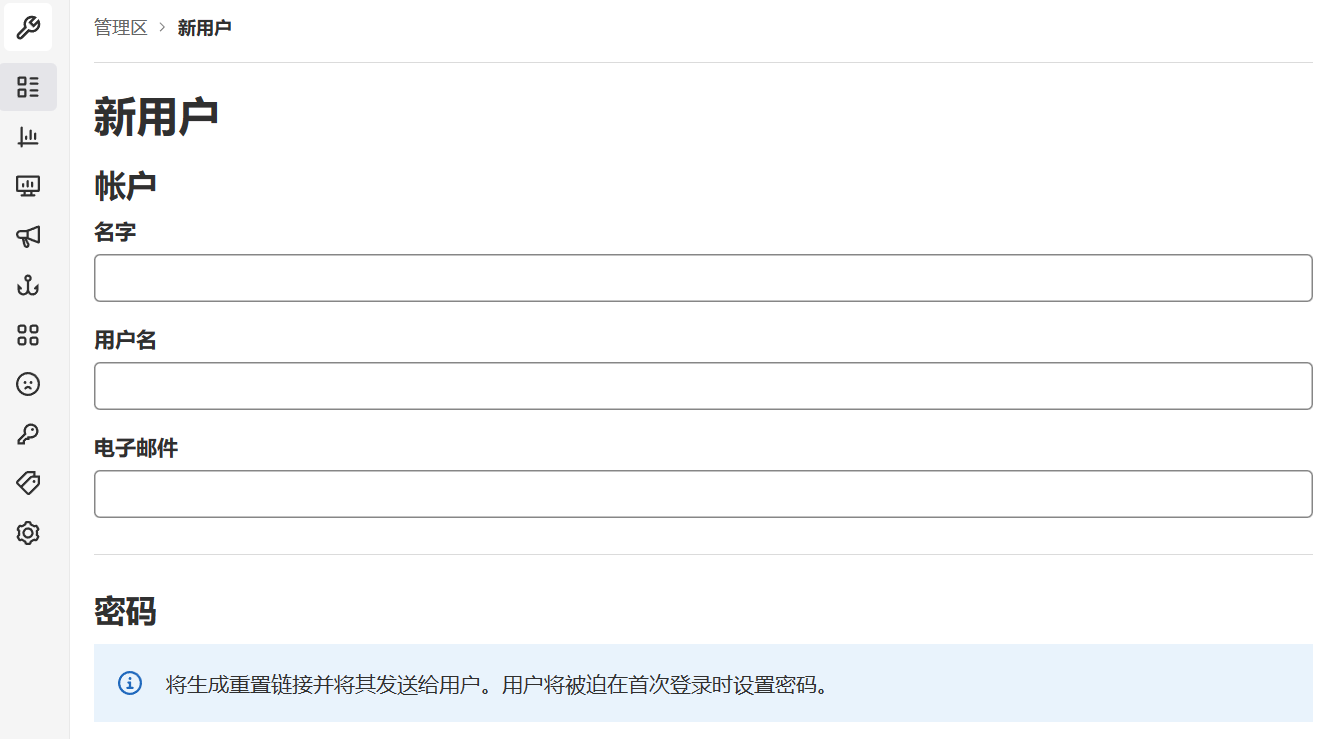
创建新用户
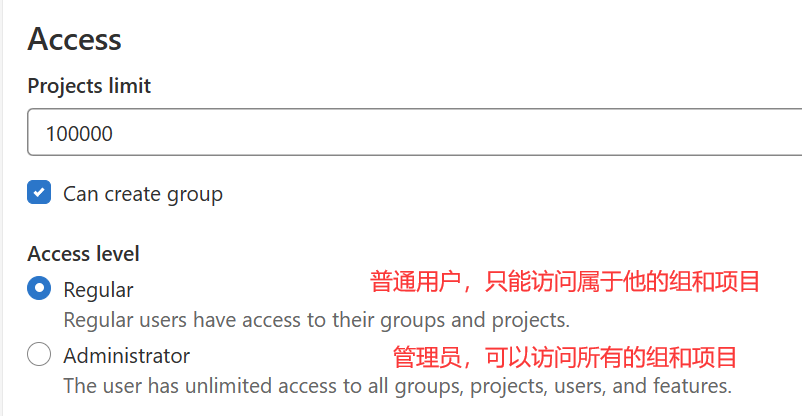
创建用户时,可以选择Regular或Admin类型
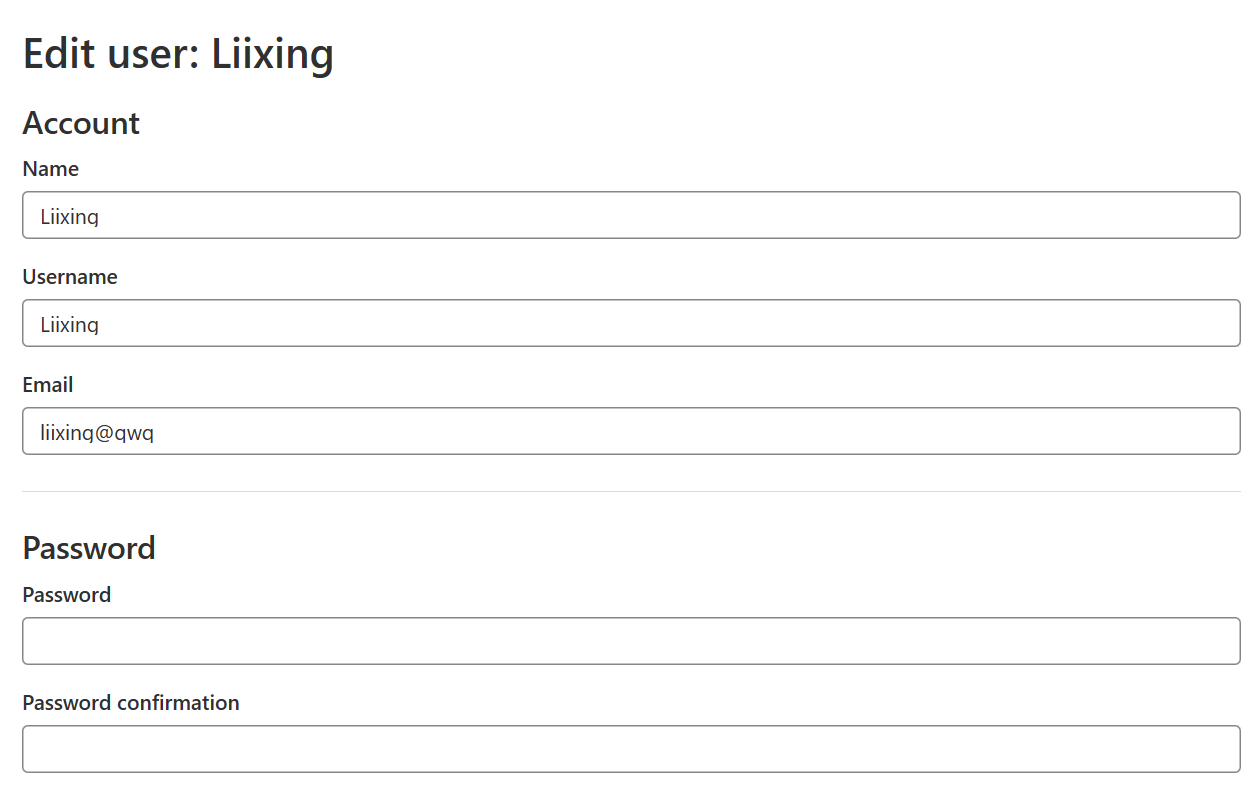
用户创建完成后可以进入Edit界面设置密码
将用户添加到组中
选择某个用户组,进行Members管理组成员
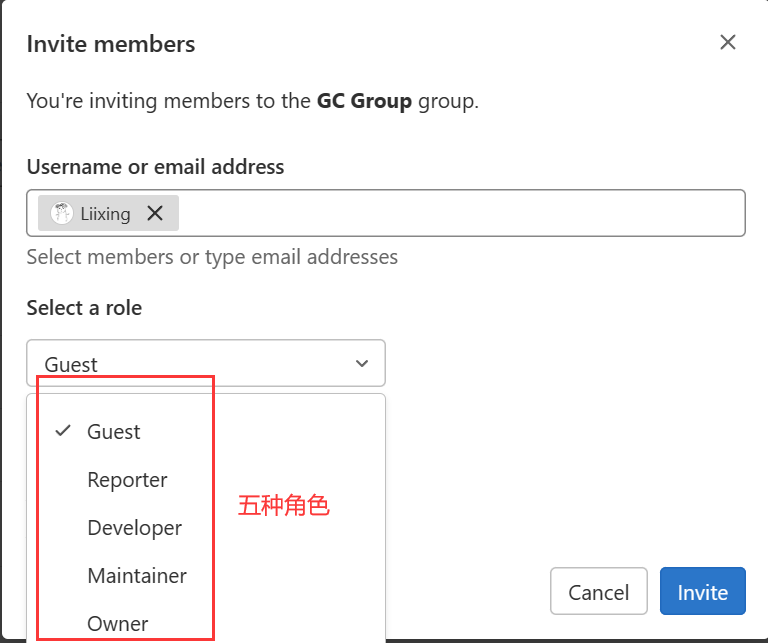
GitLab用户在组中有5种不同权限:
- Guest:可以创建issue、发表评论,不能读写版本库
- Reporter:可以克隆代码,不能提交,QA、PM可以赋予这个权限
- Developer:可以克隆、开发、提交代码,普通开发可以赋予这个权限
- Maintainer:可以创建项目、添加tag、保护分支、添加项目成员、编辑项目,核心开发可以赋予这个权限
- Owner:可以设置访问权限、删除项目、迁移项目、管理组成员,开发组组长可以赋予这个权限
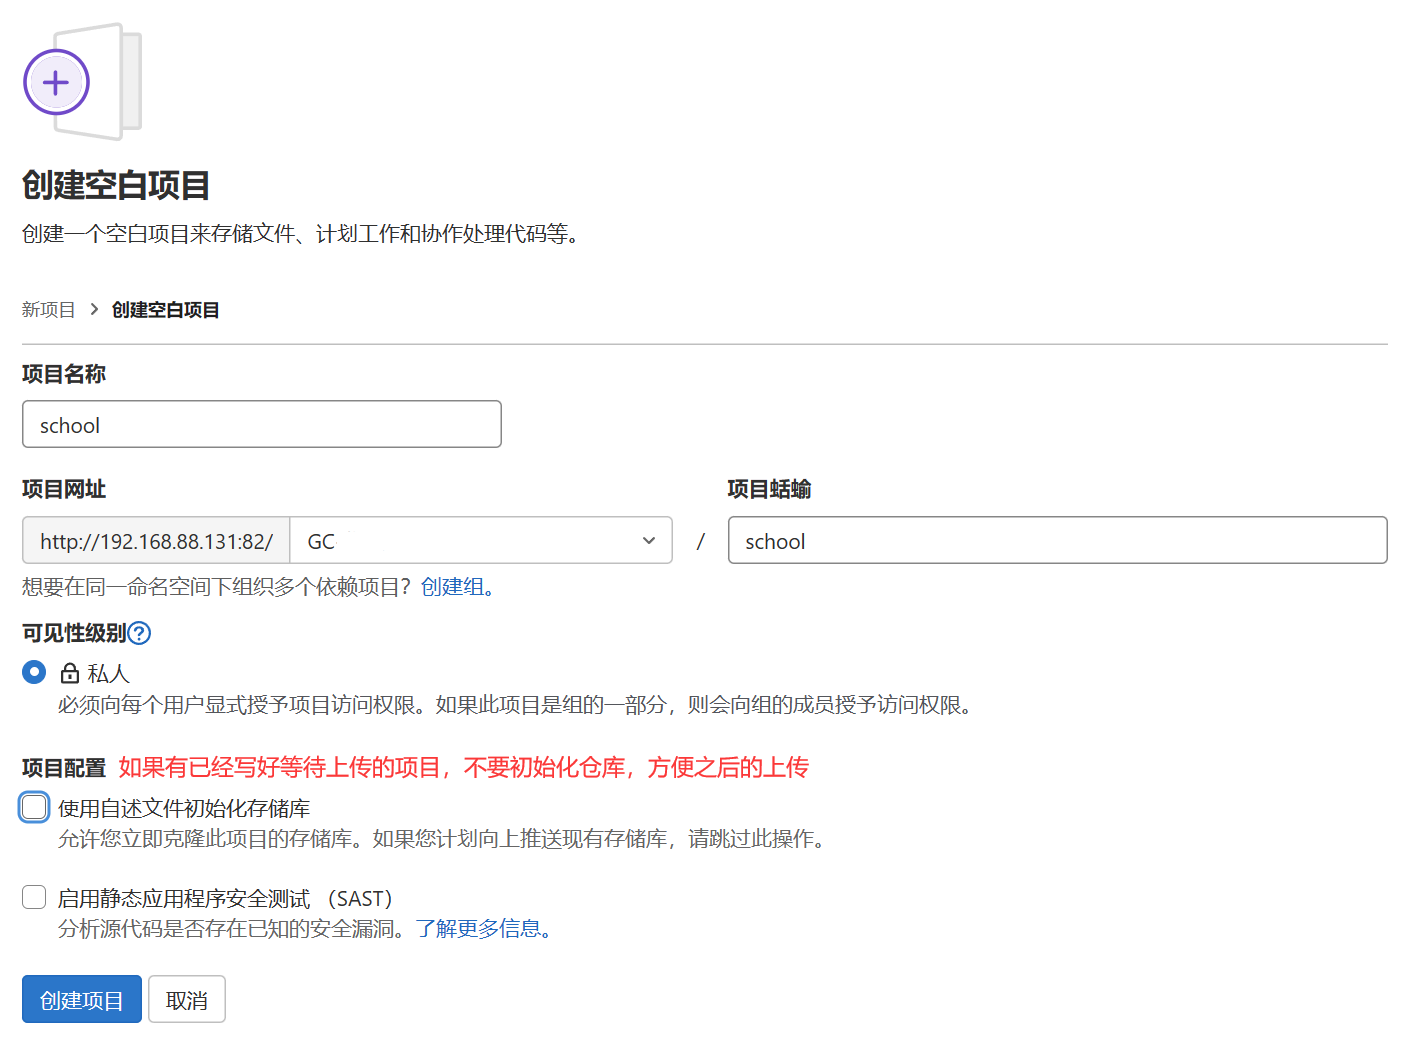
在用户组中创建项目
将源码上传到GitLab仓库
使用IDEA上传现有项目
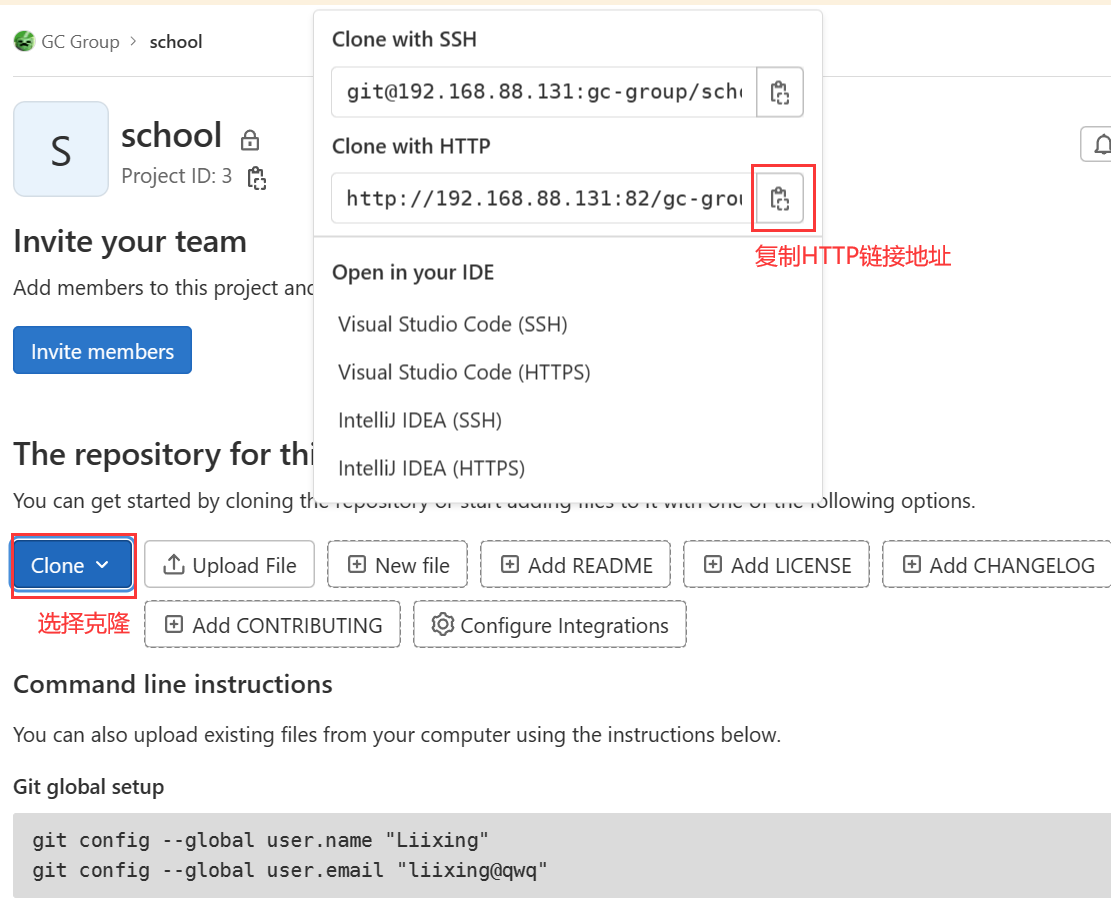
克隆仓库地址
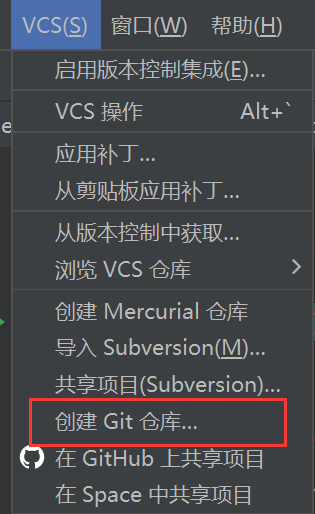
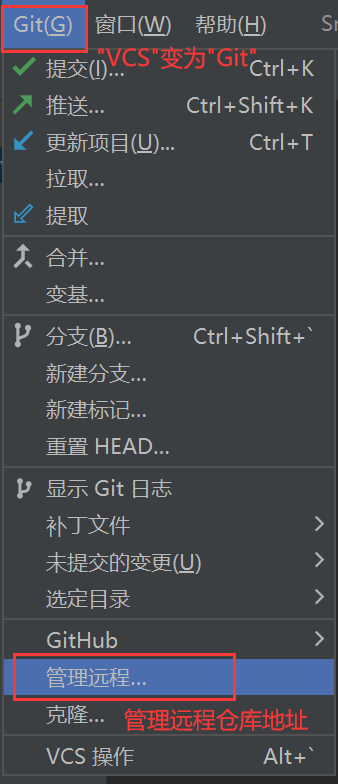
为项目启用版本控制,添加Git仓库
管理远程仓库地址,添加GitLab地址链接
管理Git远程
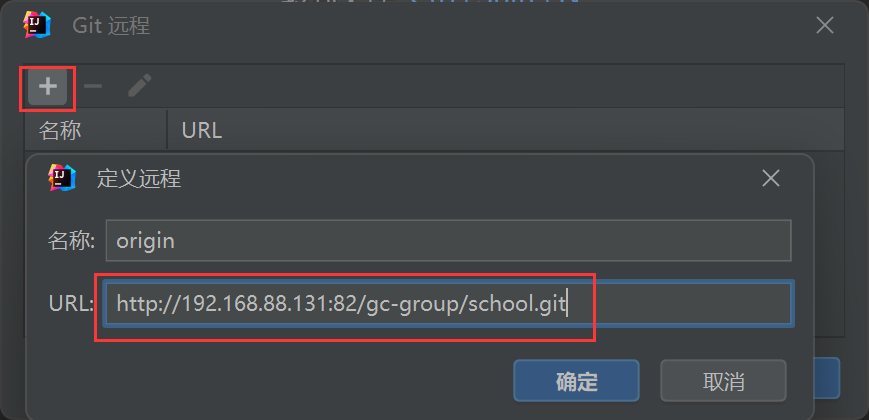
添加远程Git仓库地址链接,输入复制的GitLab仓库克隆地址
- 推送(push)到GitLab远程仓库
环境二:持续集成服务器
192.168.88.132
持续集成环境(1)-Jenkins安装
安装Jenkins
🔺推荐按照 官方步骤 进行安装,略去步骤1~3
wget -O /etc/yum.repos.d/jenkins.repo https://pkg.jenkins.io/redhat-stable/jenkins.repo
rpm --import https://pkg.jenkins.io/redhat-stable/jenkins.io.key
yum upgrade
# Add required dependencies for the jenkins package

sudo yum install java-11-openjdk
sudo yum install jenkins

sudo systemctl daemon-reload
[root@localhost ~]# jenkins --version
2.387.1
安装JDKJenkins需要JDK依赖,此处安装JDK1.8yum install java-1.8.0-openjdk* -y安装目录为 /usr/lib/jvm
Jenkins(LTS)版本支持JDK列表:
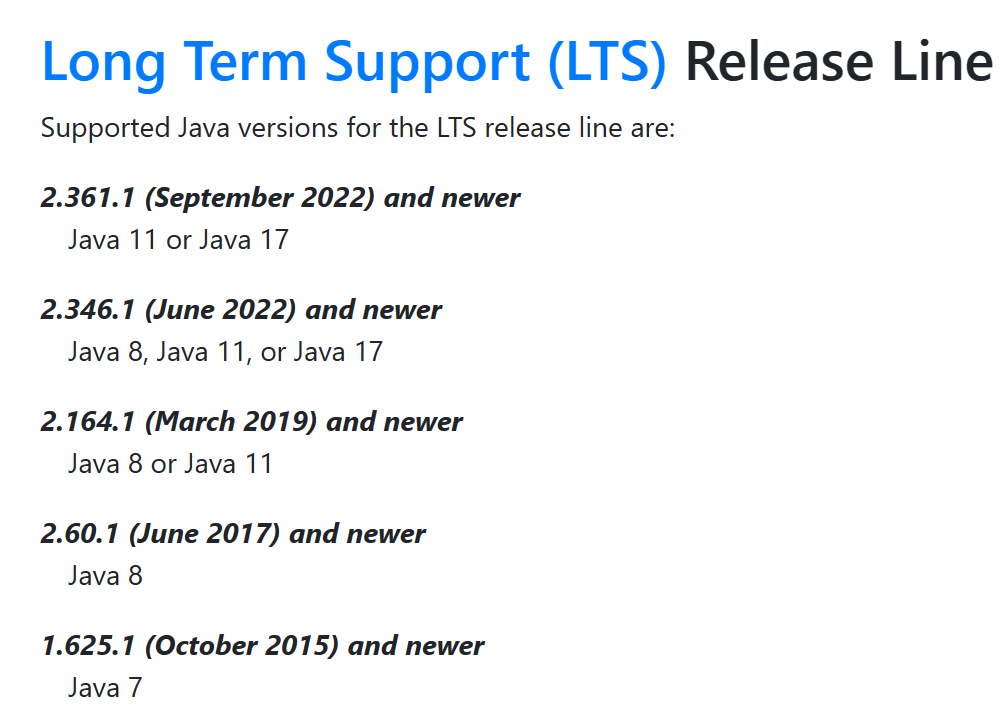
获取Jenkins安装包
下载页面:https://jenkins.io/zh/download/
此处按照 官方步骤 进行
wget -O /etc/yum.repos.d/jenkins.repo https://pkg.jenkins.io/redhat-stable/jenkins.repo
rpm --import https://pkg.jenkins.io/redhat-stable/jenkins.io.key
如果进行完以上两步直接进行
yum upgrade操作则不会以下错误踩坑,报错如下:
 已加载插件:fastestmirror, product-id, search-disabled-repos, subscription-manager

 This system is not registered with an entitlement server. You can use subscription-manager to register.

 Loading mirror speeds from cached hostfile
 Could not retrieve mirrorlist http://mirrorlist.centos.org/?release=7&arch=x86_64&repo=os&infra=stock error was
 14: curl#7 - "Failed to connect to 2a05:d012:8b5:6503:9efb:5cad:348f:e826: 网络不可达"


  One of the configured repositories failed (未知),
  and yum doesn't have enough cached data to continue. At this point the only
  safe thing yum can do is fail. There are a few ways to work "fix" this:

 1. Contact the upstream for the repository and get them to fix the problem.

 2. Reconfigure the baseurl/etc. for the repository, to point to a working
    upstream. This is most often useful if you are using a newer
    distribution release than is supported by the repository (and the
    packages for the previous distribution release still work).

 3. Run the command with the repository temporarily disabled
        yum --disablerepo=<repoid> ...

 4. Disable the repository permanently, so yum won't use it by default. Yum
    will then just ignore the repository until you permanently enable it
    again or use --enablerepo for temporary usage:

        yum-config-manager --disable <repoid>
    or
        subscription-manager repos --disable=<repoid>

 5. Configure the failing repository to be skipped, if it is unavailable.
    Note that yum will try to contact the repo. when it runs most commands,
    so will have to try and fail each time (and thus. yum will be be much
    slower). If it is a very temporary problem though, this is often a nice
    compromise:

        yum-config-manager --save --setopt=<repoid>.skip_if_unavailable=true

Cannot find a valid baseurl for repo: base/7/x86_64
此时yum无法使用,修复方法:
- 进入
/etc/yum.repos.d - 将
jenkins.repo改掉,此处改为jenkins.repo.backup
- 进入
安装文件
rpm -ivh jenkins-[version].noarch.rpm此处按照 官方步骤 进行
新的版本需要JDK11
yum upgrade
# Add required dependencies for the jenkins package
yum install java-11-openjdk
yum install jenkins
上文解决yum无法使用问题后,直接安装Jenkins是无法找到软件包的

将文件名改回,再次进行
yum upgrade
再次运行
yum install jenkins即可成功安装(说实话有点懵逼,怎么就修好了?)
修改配置文件
修改Jenkins配置
vim /etc/sysconfig/jenkins
修改内容如下:
JENKINS_USER="root"
JENKINS_PORT="8888"
启动Jenkins
systemctl start jenkins
🔺注意:如果安装了多个版本的JDK,如果版本不支持会造成服务启动失败,可以通过
update-alternatives --config java调整默认Java版本修改Jenkins服务端口
解决问题:无论怎么修改配置文件,Jenkins依然使用默认的8080端口
修改
/usr/lib/systemd/system/jenkins.servicevim /usr/lib/systemd/system/jenkins.service
搜索
JENKINS_PORT参数/JENKINS_PORT
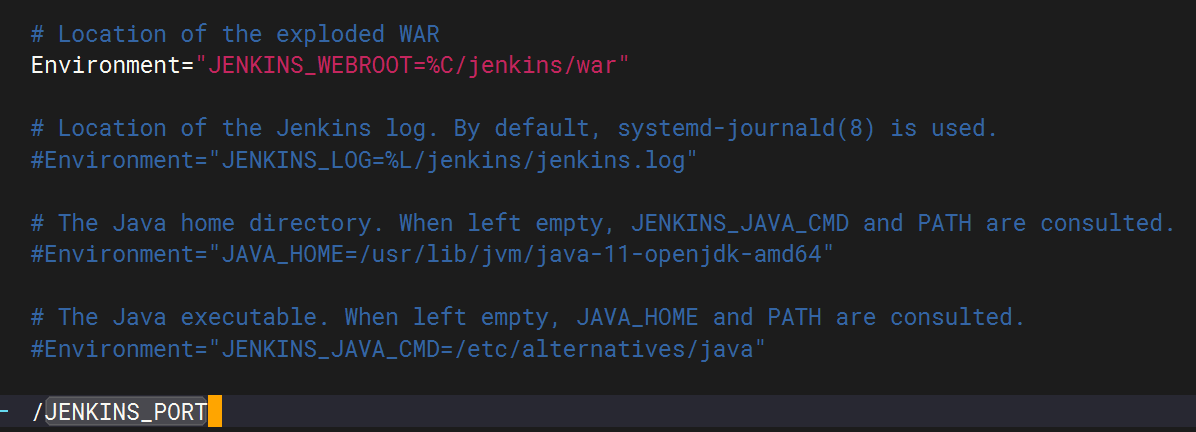
找到参数:

修改参数
修改服务端口为8088并保存

重启Jenkins服务
systemctl restart jenkins
访问并初始化
访问测试
如果开启了防火墙,需要开放Jenkins服务端口
参考 官方步骤 ,使用
firewall-cmd将Jenkins添加为例外YOURPORT=8088 PERM="--permanent" SERV="$PERM --service=jenkins" firewall-cmd $PERM --new-service=jenkins firewall-cmd $SERV --set-short="Jenkins ports" firewall-cmd $SERV --set-description="Jenkins port exceptions" firewall-cmd $SERV --add-port=$YOURPORT/tcp firewall-cmd $PERM --add-service=jenkins firewall-cmd --zone=public --add-service=http --permanent firewall-cmd --reload使用 firewall-cmd开放端口
# 添加开放端口
firewall-cmd --zone=public --add-port=8088/tcp --permanent
# 重启防火墙
service firewalld restart
批量开放 [start_port] 到 [stop_port] 的端口
firewall-cmd --zone=public --add-port=[start_port]-[stop_port]/tcp --permanent查看已开放的端口
firewall-cmd --list-ports
关闭防火墙
systemctl stop firewalld.service使用 iptables 也可以开放端口(Debian)
# 添加开放端口
iptables -A INPUT -p tcp --dport 8088 -j ACCEPT
# 将配置保存
iptables-save > /etc/iptables.up.rules
# 重启ssh服务
# /etc/init.d/ssh restart
使用 iptables -A INPUT -p tcp --dport [start_port]:[stop_port] -j ACCEPT 可以批量开放 [start_port] 到 [stop_port] 的端口
获取admin账号密码,解锁Jenkins
- 在初始页获取密码存放路径
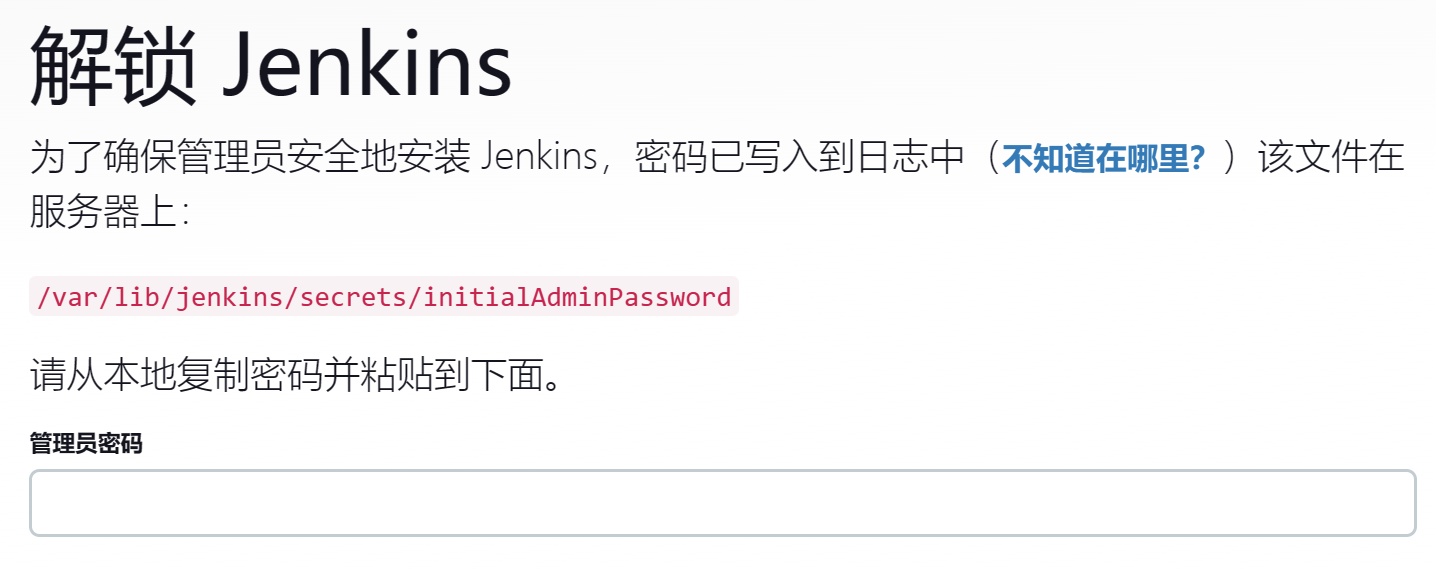
- 在服务器后台获取密码

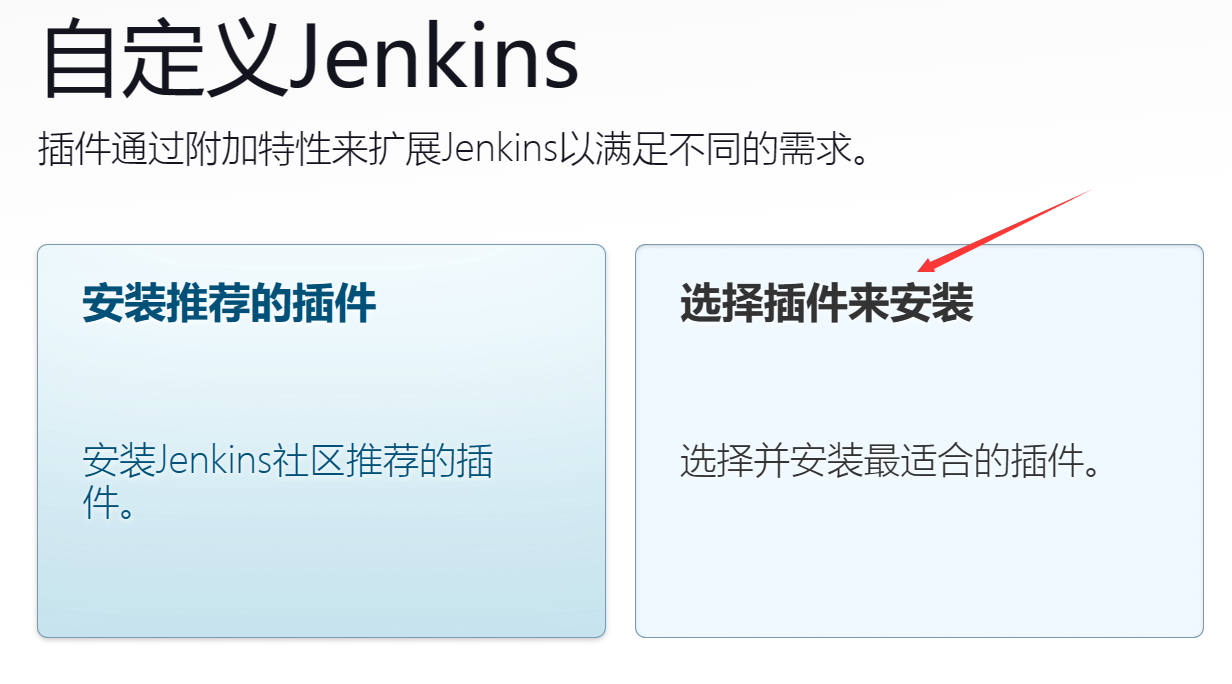
跳过插件安装
因为Jenkins插件需要连接默认官网进行下载,速度慢,失败概率大,所以暂时跳过
- 选择插件安装并选择"无"

添加一个管理员账户,并进入Jenkins后台
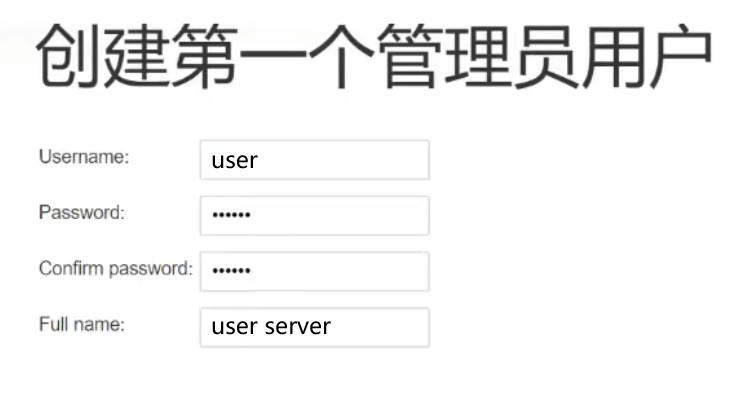
保存并完成

持续集成环境(2)-Jenkins插件管理
Jenkins本身不提供很多功能,通过插件可以实现例如:
从GitLab上拉取代码、使用Maven进行构建项目等功能。
修改Jenkins插件下载源
将官方插件列表下载到本地
进入
Manage Jenkins → Manage Plugins → Available plugins等待插件加载完成
/var/lib/jenkins/updates/default.json
修改文件,将下载源替换为国内地址
先备份
cp /var/lib/jenkins/updates/default.json /var/lib/jenkins/updates/default.json.back
进入配置存放目录
cd /var/lib/jenkins/updates/
sed -i 's/http://updates.jenkins-ci.org/download/https://mirrors.tuna.tsinghua.edu.cn/jenkins/g' default.json && sed -i 's/http://www.google.com/https://www.baidu.com/g' default.json
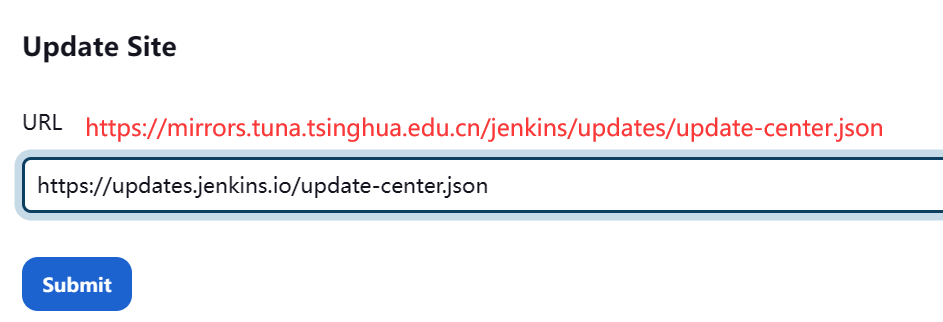
替换 Advanced setting 中的 Update Site
https://mirrors.tuna.tsinghua.edu.cn/jenkins/updates/update-center.json
重启Jenkins
在浏览器地址栏端口号之后输入
/restart进行重启
下载中文汉化插件
进入 Manage Jenkins → Manage Plugins → Available plugins ,搜索 "Chinese"
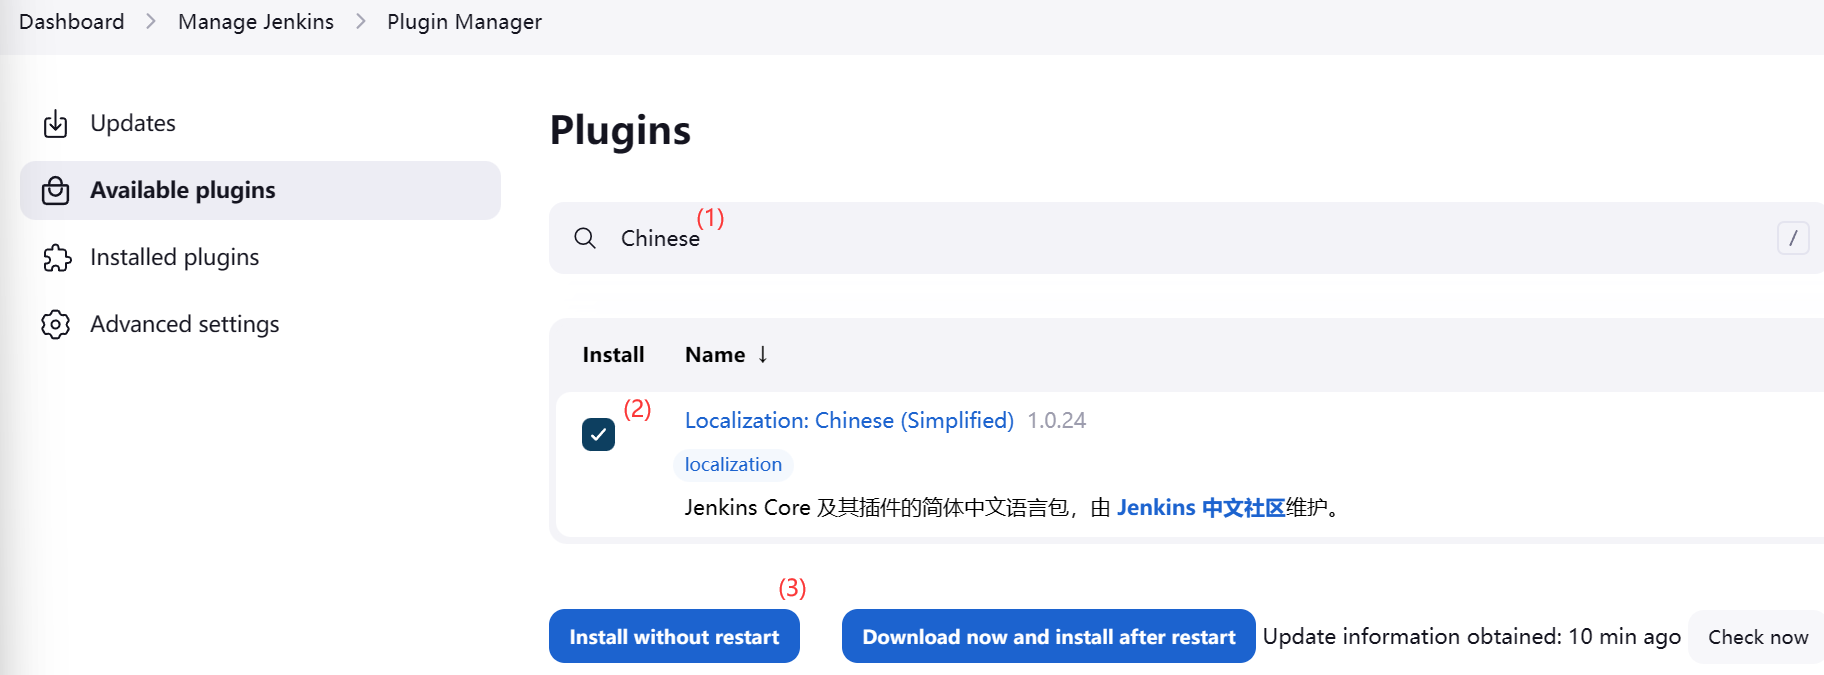
下载完成之后进行重启(刷新)
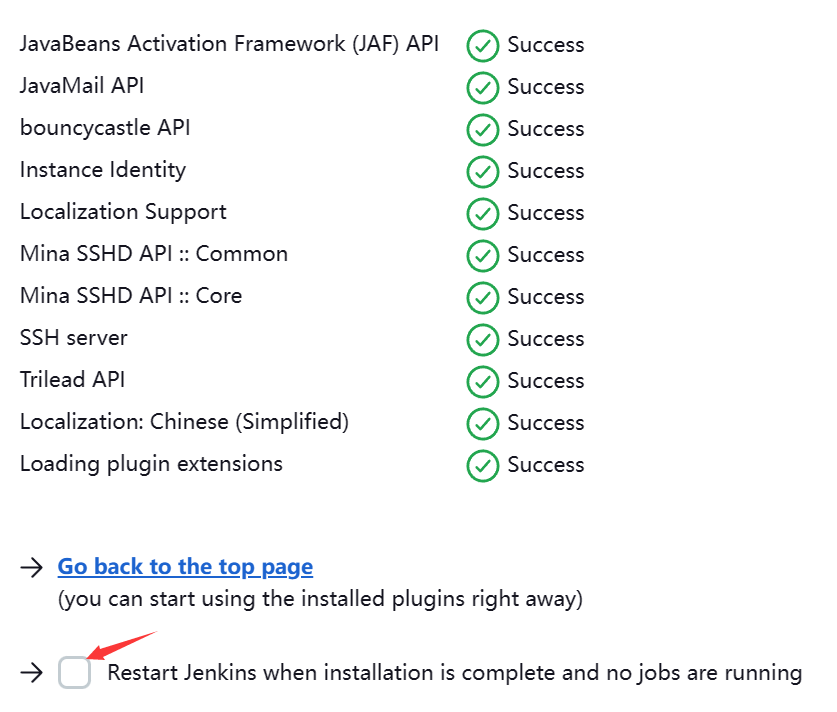
持续集成环境(3)-Jenkins用户权限管理
利用 Role-based Authorization Strategy 插件进行Jenkins用户权限管理安装 Role-based Authorization Strategy 插件

开启全局安全权限配置
管理授权策略
Manage Jenkins → Configure Global Security → 授权策略
选择 Role-Based Strategy
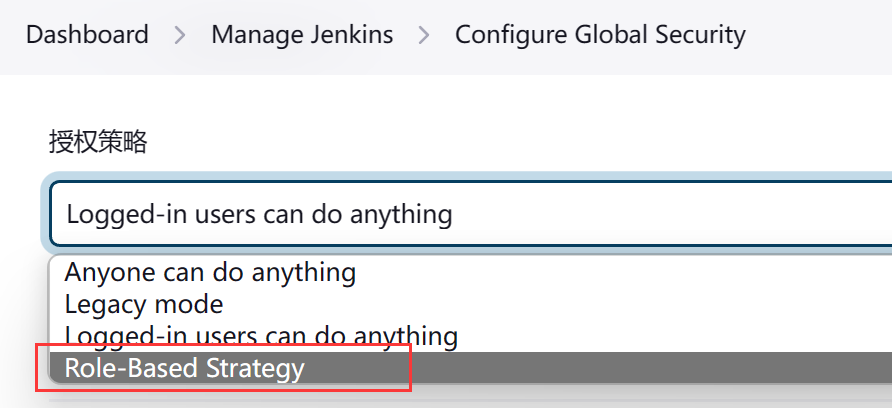
管理角色(用户组)
Manage Jenkins → Manage and Assign Roles → Manage Roles
在 Global roles 添加 baseRole 角色,开启 Overall 中的 Read 权限,使该角色可以登录
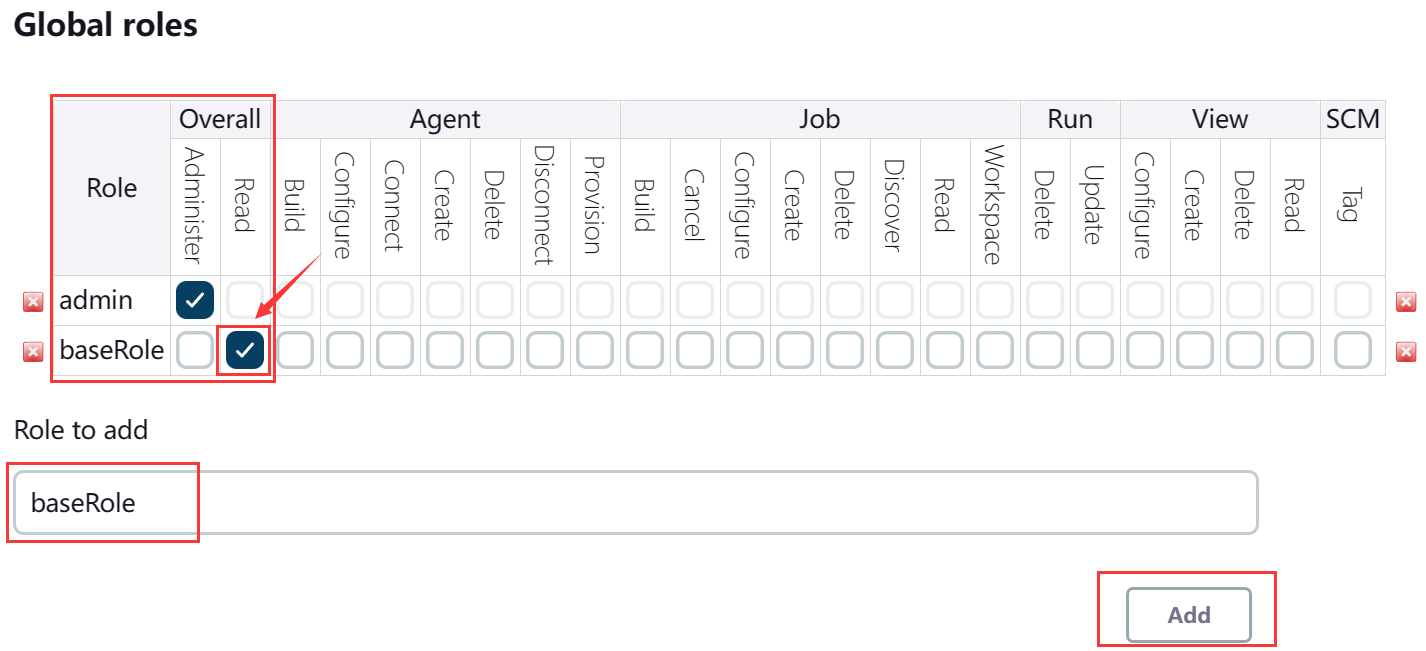
在 Item roles 添加角色,定义其可访问项目的规则
管理用户
Manage Jenkins → Manage Users
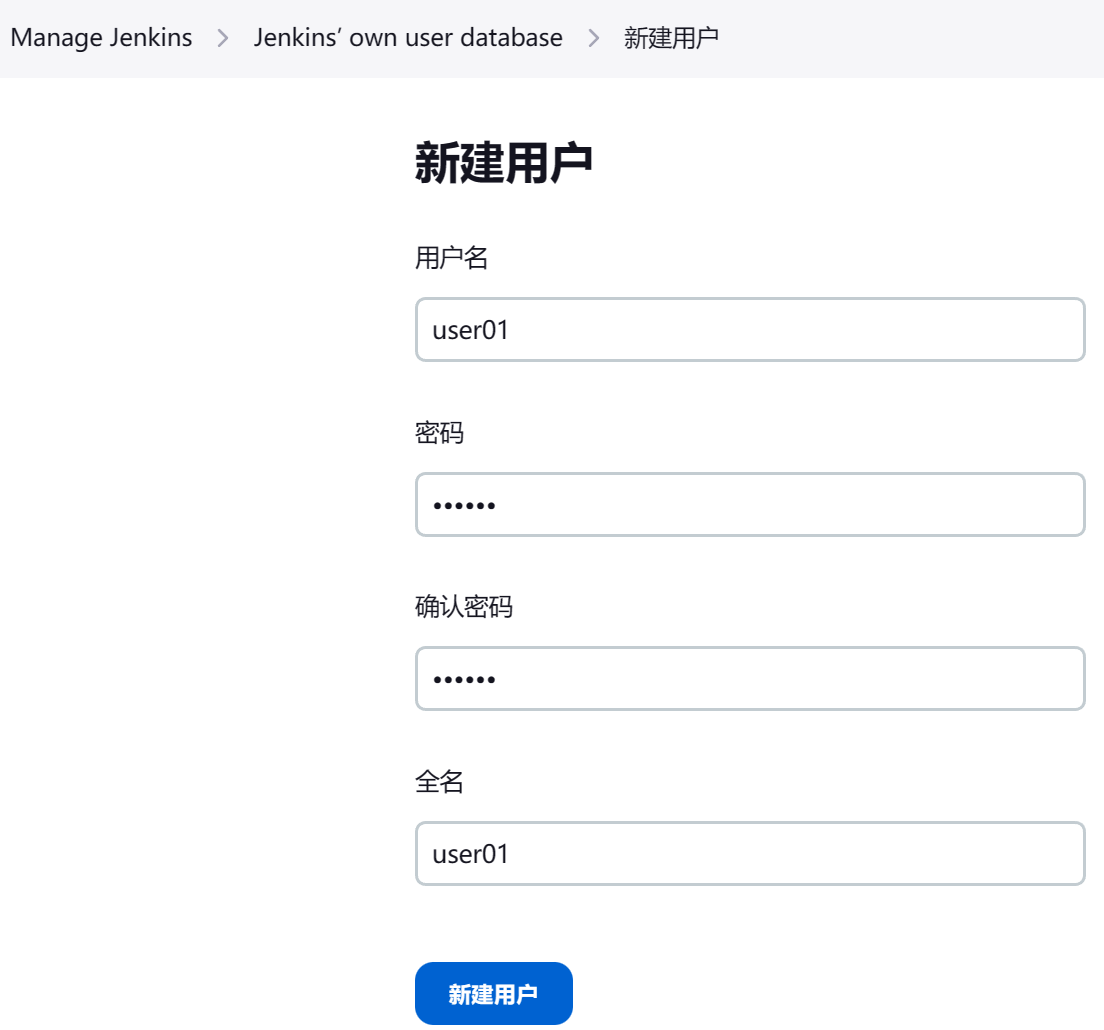
添加用户
Create User
分配角色
Manage Jenkins → Manage and Assign Roles → Assign Roles
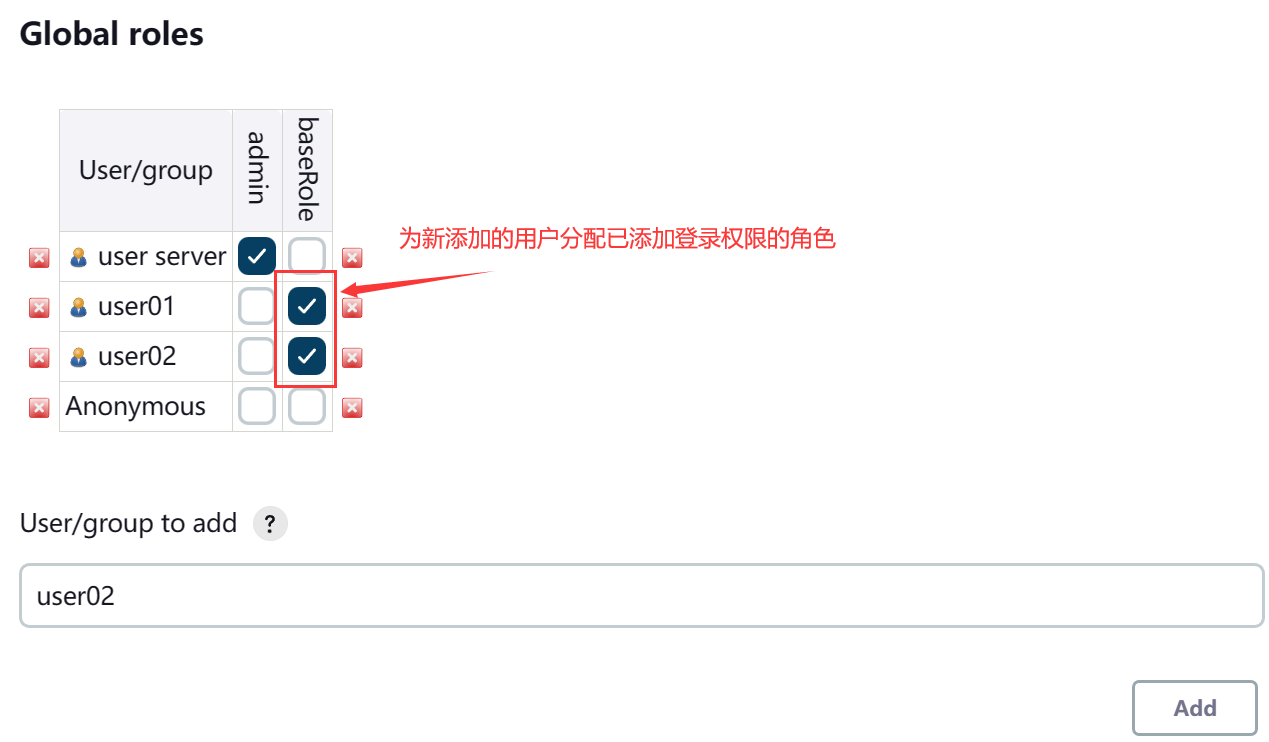
在 Global roles 管理加入已经创建的用户,并为用户分配已添加登录权限的 baseRole 角色
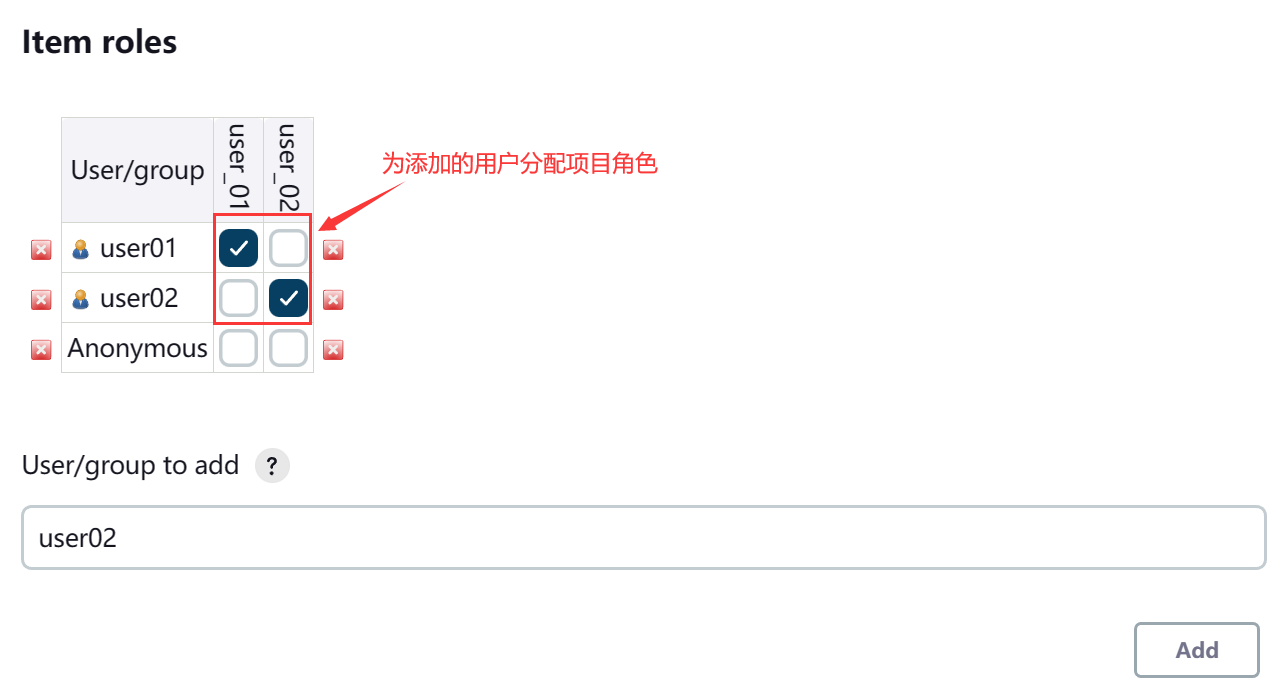
在 Item roles 管理加入已创建的用户,并为用户分配已添加项目访问权限的角色
新建项目
创建项目
新建一个 Freestyle project
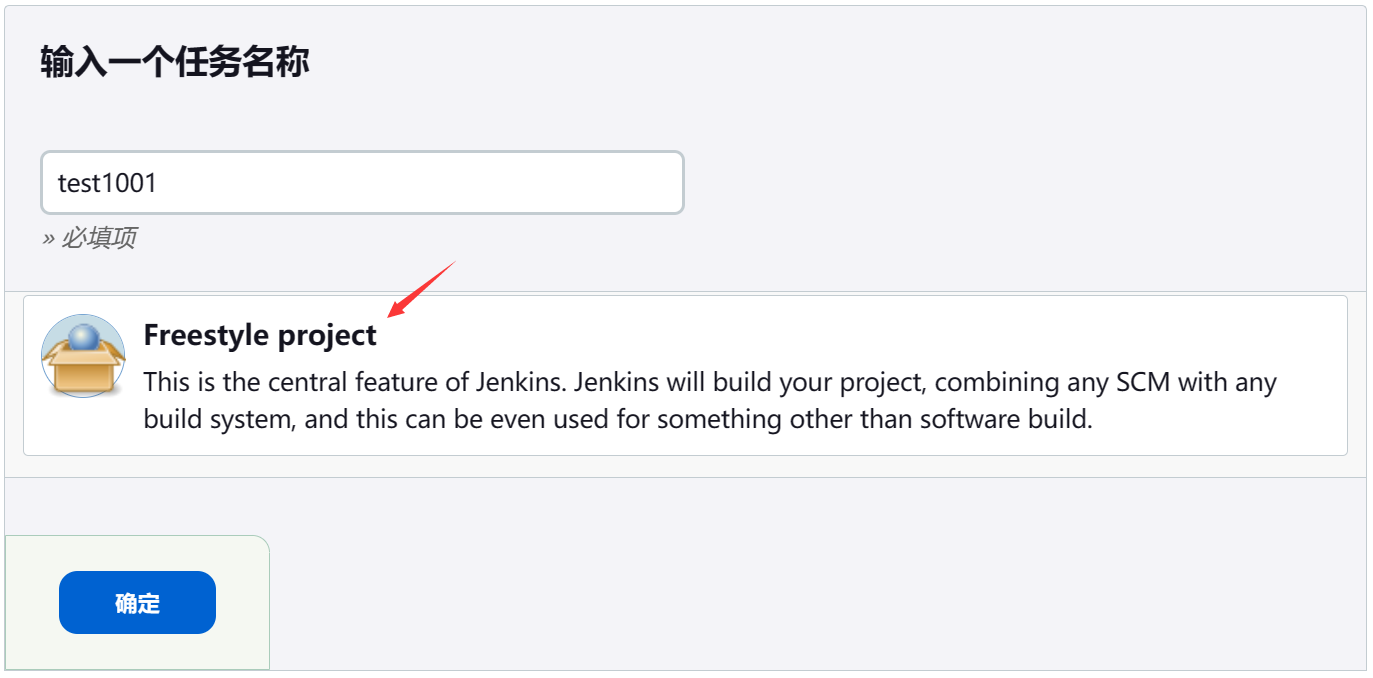
分别创建 test1001 和 test2001
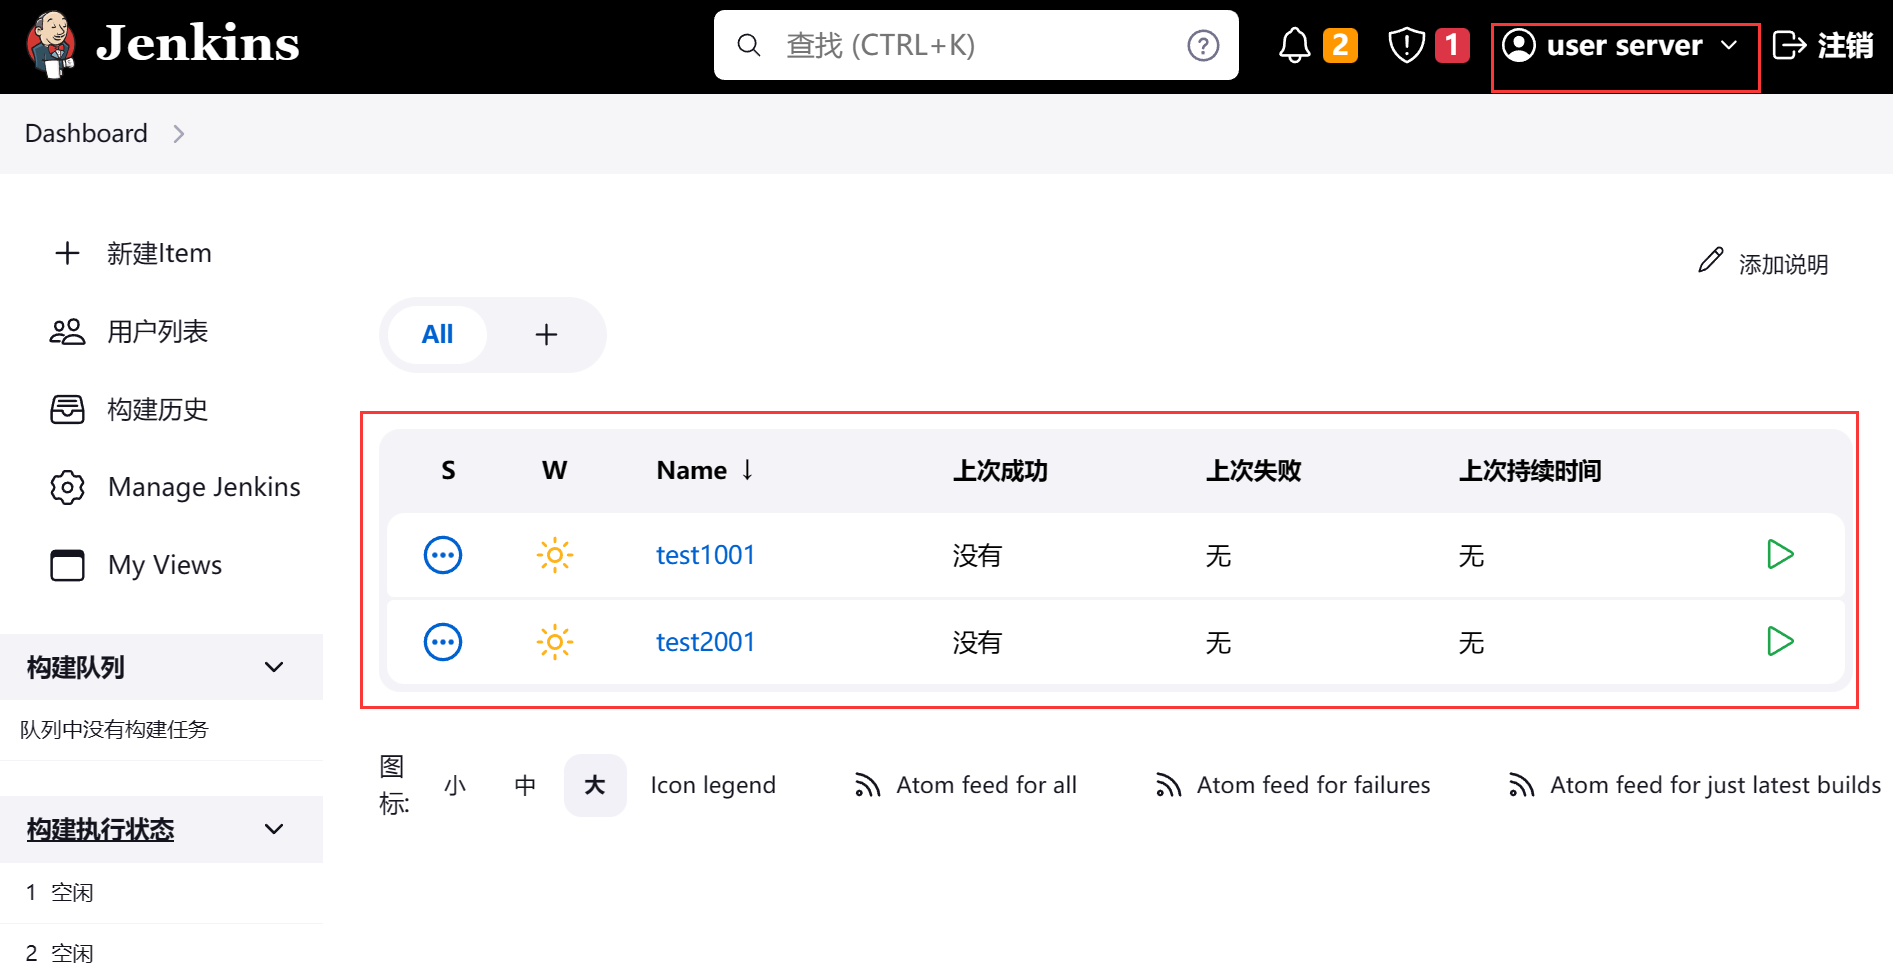
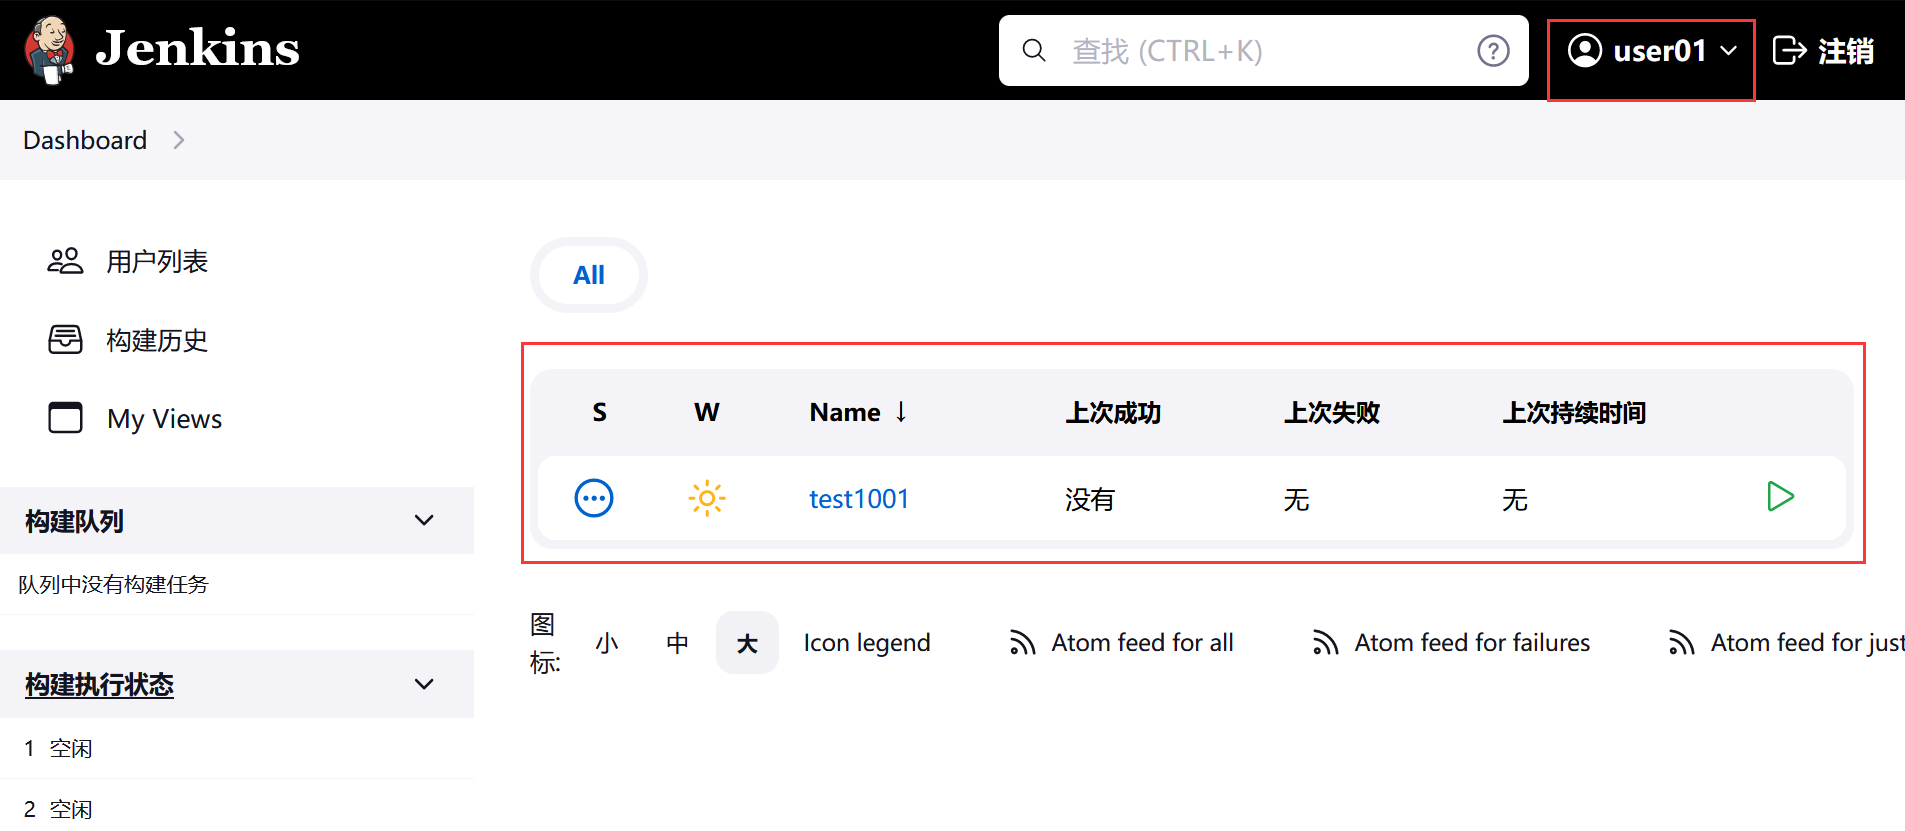
使用 user01 查看项目
只能查看 test1.* 匹配的 test1001,无法查看 test2001
